Dynamic Backlight with Phidgets
Making an adaptive backlight for your computer screen.
by James
Source Code
Download (Includes the C# source code covered in this article)
Introduction
In this article, we'll cover how to use Phidgets to make a cool backlight that adapts to the colour of your computer screen.
They say a screen-following backlight makes the screen easier on the eyes, and makes your screen look bigger. We leave that up to you. What we can confirm is that this project will wow your friends with cool tech and pretty lights.
Hardware
For this setup, we used an REL1100_0 to dim the LED modules, powered by the 12V supply.
To wire up the LED modules, we first soldered it to one end of a 4 conductor wire.
On the other end of the cable, we soldered the yellow wire corresponding to the anode to the positive end of the pigtail.
We wired the ground terminal from the power supply pigtail to one of the the common ground terminals on the REL1100, and the ends corresponding to the red, green and blue wires from the LED module to their respective channels.
With the circuit wired up, it's time to attach the LED modules to the back of the TV.
Last but not least, plug the REL1100 into the HUB000, and plug the hub into the computer sourcing the image. Plug the pigtail into the 3024_0 12V power supply.
With the LED modules plugged in and set up, we can use the Phidget Control panel to make sure everything is set up correctly.
Software
Getting the Screen Colour
Now that the LEDs are set up, we need to get the colour of the screen before we can do anything with it. For this, we take a screenshot of the entire screen, which turns out to be fairly easy in C#. This results in a bitmap containing the current screen, which we can use to get the average colour.
Be sure to dispose of the screenshot once finished with it, or this will cause a memory leak that will crash your program in minutes.
private void getScreenColor()
{
    try
    {
        // Code to capture the screen as a bitmap found at
        // https://stackoverflow.com/questions/362986/capture-the-screen-into-a-bitmap

        //Create a new bitmap.
        Bitmap bmpScreenshot = new Bitmap(Screen.PrimaryScreen.Bounds.Width,
                                Screen.PrimaryScreen.Bounds.Height,
                                PixelFormat.Format32bppArgb);

        // Create a graphics object from the bitmap.
        Graphics gfxScreenshot = Graphics.FromImage(bmpScreenshot);

        // Take the screenshot from the upper left corner to the right bottom corner.
        gfxScreenshot.CopyFromScreen(Screen.PrimaryScreen.Bounds.X,
                                            Screen.PrimaryScreen.Bounds.Y,
                                            0,
                                            0,
                                            Screen.PrimaryScreen.Bounds.Size,
                                            CopyPixelOperation.SourceCopy);
        //End of Screen Capture Code

        averageColor = CalculateAverageColor(bmpScreenshot);

        bmpScreenshot.Dispose();
        gfxScreenshot.Dispose();

    }
    catch (Exception err)
    {
        averageColor.Red = 0;
        averageColor.Green = 0;
        averageColor.Blue = 0;
    }
}
To average the screen colour quickly enough to be useful, we need to use some pointer arithmetic to navigate the bitmap quickly enough to get the average in a reasonable amount of time. In order for C# to allow this, we need to allow "unsafe" code.
By default C# does not allow pointer arithmetic, as it is not possible to verify the safety of such operations. This does not mean the operations are inherently unsafe, just that extra precautions should be taken to ensure the code does the right thing.
In this case, we're averaging every fifth pixel of every fifth row in order to minimize CPU usage and further speed up the process.
Each colour is stored in the computer's memory as a number between 0 and 255. These numbers represent the square root of the amount of each colour in the image. This has to do with how the human eye perceives light logarithmically, and approximating this in computer memory. In order to restore the colour to the intended brightness and get a more accurate average, the colours must thus be squared before they are averaged.
This process leads to average colour values that don't fit in the standard C# Color variable
type. We created our own variable type to contain these more granular RGB values.
private struct ColorRatios
{
    public double Red;
    public double Green;
    public double Blue;
}

private ColorRatios CalculateAverageColor(Bitmap bm)
{
    // This code is a modified version of the code found at
    // https://stackoverflow.com/questions/6177499/how-to-determine-the-background-color-of-document-when-there-are-3-options-usin/6185448#6185448
    // which has been specialized for our purposes.

    int width = bm.Width;
    int height = bm.Height;
    int red = 0;
    int green = 0;
    int blue = 0;
    long[] totals = new long[] { 0, 0, 0 };
    int bppModifier = 4; // This will only work for 32-bit bitmaps

    BitmapData srcData = bm.LockBits(new System.Drawing.Rectangle(0, 0,
        bm.Width, bm.Height), ImageLockMode.ReadOnly, bm.PixelFormat);
    int stride = srcData.Stride;
    IntPtr Scan0 = srcData.Scan0;

    unsafe
    {
        byte* p = (byte*)(void*)Scan0;

        for (int y = 0; y < height; y+=5)
        {
            for (int x = 0; x < width; x+=5)
            {
                int idx = (y * stride) + x * bppModifier;
                red = p[idx + 2];
                green = p[idx + 1];
                blue = p[idx];
                {
                    totals[2] += red * red;
                    totals[1] += green * green;
                    totals[0] += blue * blue;
                }
            }
        }
    }

    int count = (width * height)/25;
    ColorRatios avg = new ColorRatios();
    avg.Red = (totals[2] / count) / 65536.0;
    avg.Green = (totals[1] / count) / 65536.0;
    avg.Blue = (totals[0] / count) / 65536.0;

    //Only start updating the lights once we have colours to work with
    timer2.Enabled = true;

    return avg;
}
User Preferences
Every screen is subtly different, so we must add controls to adjust the relative brightness of the red, green, and blue LEDs to match.
In addition, everyone has their own preferences as to how bright the lights should be, and how quickly they should change, so we added controls to adjust these as well.
private void redBar_Scroll(object sender, EventArgs e)
{
    rMulti = ((double)redBar.Value / redBar.Maximum);
    redLabel.Text = rMulti.ToString();
}

private void greenBar_Scroll(object sender, EventArgs e)
{
    gMulti = ((double)greenBar.Value / greenBar.Maximum);
    greenLabel.Text = gMulti.ToString();
}

private void blueBar_Scroll(object sender, EventArgs e)
{
    bMulti = ((double)blueBar.Value / blueBar.Maximum);
    blueLabel.Text = bMulti.ToString();
}

private void brightnessBar_Scroll(object sender, EventArgs e)
{
    brightness = ((double)brightnessBar.Value / brightnessBar.Maximum);
    brightnessLabel.Text = brightness.ToString();
    if (brightness == 0)
        offState = true;
    else {
        offState = false;
        timer1.Enabled = true;
    }
}

private void speedBar_Scroll(object sender, EventArgs e)
{
    speed = (speedBar.Maximum / (double)speedBar.Value) * 4;
    speedLabel.Text = speed.ToString("0.##");

}
Since it would be tedious to reset the settings every time we use the lights, we added some basic saving and loading functionality to store a set of preferences.
private void saveButton_Click(object sender, EventArgs e)
{
    String[] settings = new String[6];

    settings[0] = rMulti.ToString();
    settings[1] = gMulti.ToString();
    settings[2] = bMulti.ToString();

    settings[3] = brightness.ToString();
    settings[4] = speed.ToString("0.##");
    settings[5] = modeBox.SelectedIndex.ToString();
    System.IO.File.WriteAllLines("adaptiveLightSettings.cfg", settings);
}

private void loadDataFromFile()
{
    try {
        String[] settings = System.IO.File.ReadAllLines("adaptiveLightSettings.cfg");

        rMulti = Convert.ToDouble(settings[0]);
        gMulti = Convert.ToDouble(settings[1]);
        bMulti = Convert.ToDouble(settings[2]);

        brightness = Convert.ToDouble(settings[3]);
        speed = Convert.ToDouble(settings[4]);
        modeBox.SelectedIndex = Convert.ToInt32(settings[5]);

        brightnessBar.Value = (int)(brightnessBar.Maximum * brightness);
        speedBar.Value = (int)(Math.Round((speedBar.Maximum / speed) * 4));
        redBar.Value = (int)(redBar.Maximum * rMulti);
        greenBar.Value = (int)(greenBar.Maximum * gMulti);
        blueBar.Value = (int)(blueBar.Maximum * bMulti);

        brightnessLabel.Text = brightness.ToString();
        redLabel.Text = rMulti.ToString();
        greenLabel.Text = gMulti.ToString();
        blueLabel.Text = bMulti.ToString();
        speedLabel.Text = speed.ToString("0.##");
    }
    catch (Exception e)
    {
        MessageBox.Show("Failed to load settings:\n" + e.Message);
    }
}

private void loadButton_Click(object sender, EventArgs e)
{
    loadDataFromFile();
}
Setting the LED Colours
Putting it all together, we set up a timer to sample the screen every 20 milliseconds, or 50 times a second. This will catch every frame of most content, and almost keep up with 60fps content, while keeping CPU usage to reasonable levels.
Another timer is run every millisecond to adjust the LED module output, making smooth transitions between colours as it goes.
private void timer1_Tick(object sender, EventArgs e)
{
    getScreenColor();
}

private void timer2_Tick(object sender, EventArgs e)
{
    updateLights();
}
We incorporated all this into a function to adjust the brightness and colour of the LED modules.
We average the brightness of the colours to get an idea of how bright the screen is. This is used to adjust the backlight to have a consistent brightness regardless of the the actual brightness of the content on-screen, as this was found to be less distracting to the viewer. This process is bypassed to allow the lights to get darker if the image on the screen is dark, to further improve the viewing experience.
We then run a series of calculations to determine the duty cycle to be sent to the REL1100 controlling the LED modules. Notably, this calculation incorporates a low-pass filter to smooth the transitions from one colour to another, which is adjusted by the speed control. This is important, as transitioning the lights too quickly is distracting to the viewer.
We send the duty cycles to the LED modules asynchronously so the program does not wait for a response from the REL1100 before continuing. This allows for much faster operation.
In addition to the mode that follows the screen colour, we've incorporated modes that set the backlight to a constant colour, or turn it off entirely.
private void updateLights()
{
    if (!redLight.Attached || !greenLight.Attached || !blueLight.Attached)
        return;

    if(offState) //Turn off the LED Modules and stop calculating for now
    {
        redLight.BeginSetDutyCycle(0, null, null);
        greenLight.BeginSetDutyCycle(0, null, null);
        blueLight.BeginSetDutyCycle(0, null, null);
        timer2.Enabled = false;
        timer1.Enabled = false;
    }
    else if (modeBox.SelectedIndex == FOLLOW_SCREEN_MODE)
    {
        double r = averageColor.Red;
        double g = averageColor.Green;
        double b = averageColor.Blue;

        double screenBrightness = (r + g + b) / 3;

        //allow the lights to go dark if the screen is dark
        if (screenBrightness < 0.1)
            screenBrightness = 0.1;

        redLight.BeginSetDutyCycle(redLight.DutyCycle + (rMulti * brightness * r /
            screenBrightness - redLight.DutyCycle) / speed, null, null);
        greenLight.BeginSetDutyCycle(greenLight.DutyCycle + (gMulti * brightness * g /
            screenBrightness - greenLight.DutyCycle) / speed, null, null);
        blueLight.BeginSetDutyCycle(blueLight.DutyCycle + (bMulti * brightness * b /
            screenBrightness - blueLight.DutyCycle) / speed, null, null);
    }
    else if (modeBox.SelectedIndex == CONSTANT_COLOR_MODE)
    {
        redLight.BeginSetDutyCycle(rMulti * brightness, null, null);
        greenLight.BeginSetDutyCycle(gMulti * brightness, null, null);
        blueLight.BeginSetDutyCycle(bMulti * brightness, null, null);
    }
}
Background Operation
With the program's basic functionality operational, we modified it to be hidden once launched for a more seamless user experience.
public Form1()
{
    InitializeComponent();
    this.WindowState = FormWindowState.Minimized;
    Hide();

    //Other initialization code here
    //...
}
To allow access to the LED control panel, we added a NotifyIcon object to create a System Tray notification. Using that, we can open the panel when the icon is double clicked, and show the window is open in the Task Bar. Similarly, we can then hide the Task Bar icon when the window is minimized.
private void notifyIcon1_MouseDoubleClick(object sender, MouseEventArgs e)
{
    Show();
    Activate();
    WindowState = FormWindowState.Normal;
    ShowInTaskbar = true;
}

private void Form1_Resize(object sender, EventArgs e)
{
    if (FormWindowState.Minimized == WindowState)
    {
        Hide();
        ShowInTaskbar = false;
    }
}
Starting the Program on Startup
Having to manually start the backlight program every time the computer boots can get tiresome, but it is possible to make the program run automatically when the computer starts to avoid this problem.
All we need to do is place a shortcut to our program in the folder called:
C:\Users\[username]\AppData\Roaming\Microsoft\Windows\Start Menu\Programs\Startup
IR Remote Control
For convenience, we added a 1055 PhidgetIR to detect signals from an infrared remote. This allows the program to notice when the TV is being turned off and turn off the backlight to match, and vice-versa. The program was also configured to adjust the backlight brightness with other IR codes.
void ir_Code(object sender, IRCodeEventArgs e)
{
    if(String.Equals(e.Code, "20df10ef"))
    {
        if(!e.IsRepeat)
            offState = !offState;
    }
    else if (String.Equals(e.Code, "00ffb04f"))
    {
        offState = false;

    }
    else if (String.Equals(e.Code, "00fff807"))
    {
        offState = true;
    }
    else if (String.Equals(e.Code, "00ff906f"))
    {
        if (brightnessBar.Value <= 90)
            brightnessBar.Value += 10;
        else
            brightnessBar.Value = 100;

        brightness = ((double)brightnessBar.Value / brightnessBar.Maximum);
    }
    else if (String.Equals(e.Code, "00ffb847"))
    {
        if (brightnessBar.Value >= 20)
            brightnessBar.Value -= 10;
        else
            brightnessBar.Value = 10;

        brightness = ((double)brightnessBar.Value / brightnessBar.Maximum);
    }

    if(offState == false)
    {
        timer1.Enabled = true;
    }
}
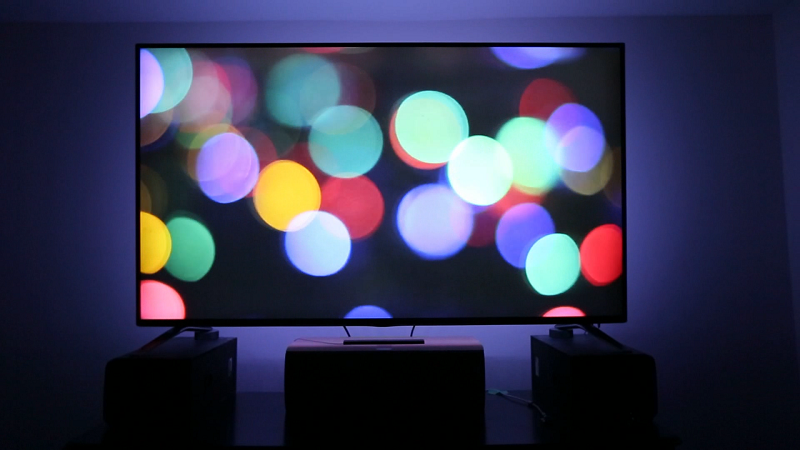
Conclusion
Now the screen has some cool backlights!
If you have any questions, let us know!